Monday, December 23, 2019

Options for Missing USNO Cel Nav Data

Update added 9/28/22. USNO site is back on the air, 2 years later, not 6 months. You can get to it with www.starpath.com/usno. We leave these notes as they still look over various ways to get cel nav data online.

On Oct 24, the USNO announced that they are shutting down their USNO web site for 6 months. We can only conclude that they discovered issues that needed immediate attention, maybe security related, and that it would take that long to repair or rebuild.


Those who study cel nav had an immediate giant hole in their resources, particularly with the missing Celestial Navigation Data page. We have described this page in various places as the "celestial navigator's dream machine," because with a very clean input it outputs all we need to analyze a set of sextant sights, either for real navigation, or, much more often, for practice or analysis.

We have relied on this USNO source for years in our teaching; many of our exercises and quiz answers call on it for quick reference. Consequently, we need at least a temporary replacement, which has led to this note.

Here is a sample input page from the now missing USNO site, followed by a couple random sample output pages.


Input is just Lat, Lon, and time.

This input page and the following output pages are random, in that I just looked through my computer for samples that I had saved for one reason or another. The site is offline, so these sample are not related to each other.  The marked data must have had some meaning at the time. A couple output pages:


This one just shows the first few because I had cut it off, and did not save the full output.
This is the full output for this time and location.  We will use this output to compare with what we can get at the moment from other sources. I do not know why Mars and Markab were marked at the time, but we can use those two data points going forward.

Note all of what we get. The Dec and GHA, telling us where the body was at the moment. These are equivalent to the Lat and Lon on earth where the body would be directly overhead at that time.  Then we get the height of the body above the horizon (Hc), and the true bearing to the body at that time (Zn).

Those computed values are the ideal answers, meaning height of the center of the object with no atmosphere. The numbers on the right show how much atmospheric refraction and the size (sun and moon) affect what we measure with the sextant. We also have to correct for our height of eye and sextant index error, but these are unique to us and not to the astro data. In short, this page served as both a Nautical Almanac and a set of Sight Reduction Tables.  

This type of data provides ideal cel nav practice. We could, for example, just look at this list and pull out these sights:
and then assume that these are the three sights we obtained on that date at that time. Then we carry out normal cel nav sight reduction and plotting to see how close we were to 45º 00'N, 137º 00' W. Note we are assuming here all Ho, observed height, which have the various sextant and altitude corrections removed. You can do this for any ocean, any time and date, sun, moon, stars, and planets, i.e., a dream machine for learning cel nav.

Well... this is gone for a while, but there are other resources that fill the gap, at least in large part. 
One such online resource that we can recommend is the fine work of Bill Ritchie, called Astron. It is a full function celestial navigation utility accessible online, including an output similar to what was given by the USNO site. The input page is shown below, set up to duplicate the data shown above that we had captured from the USNO earlier this year.


This resource offers much more than a list of available bodies, but for now we are looking at only that one feature, which we find under the Almanac Tab on the bottom, shown below.


The presentation is similar, but Astron also includes bodies that are below the horizon at the selected time. "Azm" is the azimuth (Zn). A check will show they are the same final data, just presented differently. We do not get the altitude corrections that the USNO site provided, but these are needed less often than the rest of the data. 

If specific altitude corrections are needed to make more specific practice problems and you do not have an almanac that they can be determined from, you can get these corrections from Stan Klein's PC program Celestial Tools. This free Windows program will also provide a list of bodies available at any time, date, and location, and, like Astron, also has many other valuable functions.

Another excellent full-function online cel nav resource has been created by Jorrit Visser called CelestialNavigation.nl.  Here is his presentation for the same sample date and time, found under the tab Celestial Navigation Data, the same name used at the USNO.


This utility seems to impose a minimum altitude of 10º above the horizon, which is generally a good idea, but maybe not for this type of display. It does not limit high sights. See related notes below.

Again, this is just one display option from this versatile online cel nav program, which also includes lunar distance computations.

A bigger limitation on this resource is it only goes back 3 years, and very often we refer to such a reference to check historic data.
_________

I should also mention our own StarPilot program can of course make this list as well, the most direct being from within the Sight Planner routine, which generates the display shown below. These computations do not have time limits, but we must be aware of calendar changes on early data, plus  some limitations on very old moon data—1582 would be a practical limit on the almanac data.


In this display we get a list of bodies above the horizon, accounting for several user-selected filters. First we set minimum brightness, 2.0 in this example, and we set minimum and maximum altitudes, which is above 10º and below 80º in this example. These height limits improve the final fix accuracy in many cases. See related note.

We can display a list of the bodies, which can be exported to a txt file, or we can display the sequence of best triads of bodies for optimum accuracy. The practice example proposed above was from this computation. This customizable best-sights function is a unique feature of StarPilot. Then as you click the screen you step through the optional triads, marked graphically.  This program includes many unique cel nav computations and predictions, as well as being state of the art in piloting computations, which are used many times daily on a typical voyage on inland or coastal waters.

______________

Note added on May 1, 2020.  The April 30 date they proposed for the new website has come and gone, and no USNO website yet.  This could be covid related. We do see on another part of the USNO site this new notice:


Thursday, December 19, 2019

Who Is Ahead in an Ocean Race?

In a typical ocean yacht race there is a daily position report from all vessels giving their position at some predetermined time, sometimes along with wind and pressure. A key job of the navigator is to analyze these relative positions to see how the race is progressing, and who is doing what. In the old days, I would do this with a universal plotting sheet and compute great circle and other distances with a hand held calculator. Looking over the discussion of this topic in our Weather Trainer program, I discovered some of the old school discussion was still there, which has led to this note—and an update of that topic in the program. These days we have better tools... although there can still be virtues to doing this by hand on a plotting sheet or paper chart.

These days using tactical navigation programs, we have several new options, including just plotting all the positions we care about right in the main navigation program we are using, or we could run a separate nav program for this purpose, even in a separate computer. You could, for example, be doing your primary weather routing with Expedition or Deckman, and use something like OpenCPN for a running log of vessel positions and related analysis. This has the virtue of allowing two people to work on the navigation at the same time, plus it allows for more experimental plotting and evaluation without tying up the main nav computer or risking confusing anything.  I will do this example here using OpenCPN. At the end here we look at even more automated methods.

For a real world example, we use two days of reports from the 2014 Vic-Maui Race. Other than looking for some data online, this is otherwise a random choice. Then we just went a couple days into the race and said we will use Division C, looking at July 7 and July 8. The relative positions of these two days are shown below.


The top cluster is the July 7 reports, below it the July 8 reports, along with a great circle (GC) route to Maui—although that is not at all the intended route of any vessel at this stage, which is typically  more toward something like 40N, 130W to get around the Pacific High.

To see how this works on your own you should be able to take any race, any division, and any two days. These data are shown below.

When the data is received over the radio, it is usually recorded in forms that are part of the race packet. Once the data are recorded, we then transfer them to a chart, plotting sheet, spreadsheet, or as in this case, we plot the positions in OpenCPN.

On July 7 at check in time, we only know what is in the top report.  These are plotted below and for this exercise, we assume we are the vessel Passpartout.


Our own (pretend!) vessel position is marked by a star. From this position we compute the initial heading of the GC route to the finish line, and draw that in red, about 233 T in this case. Then we construct with the route tool a line perpendicular to that GC heading, also shown in red here. This gives us a quick look at relative positions. All vessels on the red line are same distance from the finish.

We see that Turnagain is 6.6 nmi ahead of us, and Turicum is 19.4 nmi ahead of us, and the other two are rather far behind, 32.5 nmi and 57.2. With only one day of reports, we do not yet know of routes and speeds, however, we do know one important thing: we are the southernmost boat. In this race at this point, that could be an advantage.  But now we just have to see how things progress by looking at July 8.


Now we can see what the fleet has been doing by just making a route between day 7 and day 8 positions, and divide by 24 to get SMG. Zooming in on Day 8 we see the following.


Turnagain remains ahead of us, but we are sailing same SMG (8.0 kts) and we have gained 2.1 nmi on them (6.6 to 4.5) This is because for now we are sailing closer to the GC heading; they are sailing about 9º lower, more to the south.

 We can't rely on the true wind reports given—notice they are all over the board in the reports—but we do know the wind has been N-NW, and they are sailing lower and making the same 8 kts.... and so on.  This is the type of analysis one can do with these plots.

Another way to do this is to enter the daily reports in a programmed spreadsheet and have it auto compute all you care about. You know the destination, so you can compute GC distances do go for every vessel and then compare that to your GC distance, which will directly tell you who is ahead and by how much. With this system you can fold in ratings for a true output of the race status. You can also of course compute SMG and CMG for each, vessel.  This can all be set up and tested before the race. Nevertheless, there can still be virtue in seeing how the routes compare graphically.

You also likely know at some point the speed potential of your competitors, so if a SMG seems to low, and the CMG too high or too low, then you know they have likely jibed during that route. It appears in this case that Turicum  had jibed during these past 24 hr.  Recall when we draw in that line this is only course made good, we do not know the actual track taken. This is why jibes might be carried out right after checking in whenever tactically feasible so they have the biggest impact, before giving away that you have jibed.

More modern methods are even more intense! Several companies offer vessel tracking services with vessel positions posted online providing a wonderful way for spectators to follow the race. These services are popular with cruising sailors as well, offering a way for friends and family to follow along the voyage. Tracked positions are updated typically every hour, but in some cases like the Swiftsure Race plot shown below, they are essentially live data at the time of the race. These data are then often archived to be viewed later on.


This is early in the 2019 race, picture compliments of Andrew Haliburton, who was navigating Riva, the leading boat at this time.

These tracking services were originally intended for spectators, but there is cell phone coverage over the full 80 nmi of this race course (along the Strait of Juan de Fuca between Washington state and BC, Canada), and anyone can download the positions—on land, or on the water taking part in the race. This gives a very nice near real time snapshot of who is doing what, but you would have to do custom programming to capture the data digitally.

For ocean races there is no cell phone connections, but we still have satphones and Iridium Go devices that can be used to load any internet webpage, but albeit at very slow and expensive rates. Most large races have some internet coverage for spectators, with YB Tracking (formerly "Yellow Brick") being one of the world leaders in this service. Again, this was originally intended for spectators at home, but it is not illegal to access this from your boat at sea if you are willing to spend the money to do so.

YB race positions are typically updated every hour at a specific time, so you can set your watch to remind you when there are new data. This way you get to see all the positions laid out on an hourly basis so you know what your competitors are doing.

Sophisticated racing software such Expedition and Deckman have access to the YB database built right into the programs and anticipating this, the racing instructions often include the link to the data along with the ID of the race. Here, for example, is section 10.3 from the 2019 Sydeny Hobart Sailing Instructions

10.3 RRS 41: Further to NoR 7.3(a), Whilst racing a boat may retrieve data from the standings pages of the event website or from https://www.rolexsydneyhobart.com/standings/lite or from the text-based feeds provided at https://yb.tl/Links/rolexs2h2019.

In Expedition, this service is accessed via the Sail tab:


Below are a couple sample Expedition YB tracking plots from the 2019 Sydney Hobart Race.


The popups do not all happen at once in Expedition. These are from two different tabs; the sailing tab showing tracking data, and the weather tab showing GRIB data. 

With this type of near live information, the navigator knows what each is doing and conditions at their location. If you have polars for your competitors you can compute optimal routes for them as well... at each stage thinking over what you can do that would be smarter than what the competitors might do.

Expedition has a Scheduler function that can be set to update the tracking automatically. These data in this race are updated every 10 minutes. Then the user just presses the Sync Time button and the latest tracking is shown along with the right wind data for that time.  There are no more secret jibes.

This kind of tracking option is one of the major changes in yacht racing over the past few years. Another one on the horizon appears to be how outside assistance with regard to weather data will be defined. An interesting new topic!


Sunday, December 15, 2019

How to Make an RNC eChart From a Chart Image

Of the several earlier notes (and videos) we have on this process, this note here effectively outdates all the earlier ones.

 A typical raster navigational chart (RNC) is composed of two files. One with extension .KAP and one with .BSB. The latter is a text file including metadata about the chart and the region it covers. The former is the formatted image file of the chart itself. The format originally developed by MapTech is discussed here. The .KAP file is unusual in that it has a readable multi-line ascii text section followed by the binary image code.

This subject may have some renewed interest in the future in that NOAA will be discontinuing paper charts and the RNC echarts made from them. Also of note, is Google Earth has recently changed their policy and now offers a standard mercator projection of the earth, which means we can make our own nautical charts more easily this way now for regions that might not be well charted.

Using OpenCPN Weatherfax Plugin

I know of two ways to make the KAP files. One is use OpenCPN weatherfax (wefax) plugin; the other uses three free PC utilities. The wefax method is very easy and takes just a minute or two. The only disadvantage to this method is that (for the time being) you cannot specify the units if they are feet and other metadata cannot be edited. This means the scale will be reported incorrect and the depth units could be wrong if native units are feet. However, if you can overlook those factors and just need a chart that looks good and is properly georeferenced, that can be passed on to others, then the OpenCPN wefax method is the way to go. It is explained in the short video below. This  method is limited to image files of about 40 MB, but that should not be restrictive.

  Making KAP file with OpenCPN wefax plugin     

If we want to get the chart metadata correct so that it reports properly on the chart, then we have a longer process, but still direct once the prescription is known, which we outline here. This procedure is explained online in various formats, so this is just a local rewording and a focus on only one of several variations. To read other descriptions, search the Cruisers Forum, OpenCPN section, on ImgKap.

Using ImgKap.exe

I have earlier notes and videos on this process, but they are more complex than needed as they  calibrate the images manually and then create the header files manually as well. Here we use two utilities to do that.  For now we look at using ImgKap.exe directly, streamlined as best I can do. Again, there may be other, easier ways.

To accomplish this we need 3 free PC programs, used in this order:

    MapCal_2.exe (1.2 MB, 2/17/2013)
    mc2bsbh.exe (0.23 MB, 3/15/2010)
    imgkap.exe (3.6 MB, 1/24/2016)

The first has a normal PC windows user interface, but the second two must be run from a Windows command line, which is not familiar process to all, so we outline the steps and provide a video demo.

MapCal_2.exe is used to georeference the chart image. It is not downloaded directly, but obtained by downloading and installing an echart program called Sea Clear II that is available at http://www.sping.com/seaclear. After installing the program, look in c:\Program Files (x86) and you will see the program. You can run it from there or copy it to move to the folder we will use.  It does not require other components.  Sea Clear is a program that was way ahead of its time; this was a function it included that let you make charts out of any image. The charts it makes, however, only work in Sea Clear, and now as time has passed we have OpenCPN as a more versatile tool. But we fall back here to use a Sea Clear utility. This function creates a calibration file called CHARTCAL.DAT.

mc2bsbh.exe stands for MapCal to BSB chart header.  We use it to make the metadata part of the KAP file from the output of MapCal. You can download mc2bsbh at http://www.dacust.com/inlandwaters/mapcal along with instructions for its use, but these will be summarized here. Note that there are other proposed ways to do this at that site, including links to things that are supposed to make it easier, but I have not figured out how to use those properly, so I proceed with this basic approach. This function uses the calibration file CHARTCAL.DAT to create a header_file.hdr.

imgkap.exe is the main tool for putting the header file with the image file to make the KAP file. This is the main tool in that in principle we could calibrate the image manually and also create the header file manually without the first two utilities, but that is tedious and prone to error.  You can download imgkap at http://www.dacust.com/inlandwaters/imgkap (I used to have articles and videos on those two steps, but this note replaces all of those. In retrospect, it is almost comical how complex those early notes are! They were made before I learned of other options.)

Procedure (text followed by a video)

Step 1. Download your chart or other image and trim it to the area you want. The stock MS Paint is one way to do that on a PC. Then consider the size. We want it as small as possible that meets your needs. So zoom in on some section to see what it looks like, then duplicate it and reduce it by 50% and look again. MapCal will take things as large at 60 or 70 MB but it takes a while for it to load.

We will use a samples of training charts that we get at https://historicalcharts.noaa.gov. At the bottom of the page, select "training charts," and search. We already have online 18465TR, 1210TR and 12221TR. For now we will do Block Island Sound 13205TR. These native files are about 35 MB in JPG format.

Use MS Paint or other program to convert this to a .PNG file, which is what MapCal needs.  We start with 13205TR-05-1991.JPG (34.7 MB, 14,000 x 17500 pixels, at 350 dpi) then convert to PNG and change the file name to what you want your chart file to be called, in our case 13205TR.PNG (129.7 MB), which is too big, so reduce by 50% to get 13205TR.PNG (39.8 MB).

Now make a folder on your desktop called "IMGKAP_files" and put all three programs you need into it along with the image file itself. (You can go to program files (x86) and copy mapcal_2 to copy here.)

Now open MapCal and then choose open file and load your PNG image into MacCal and note it will take awhile to load. It may say program not responding, but just wait. This size takes about  3 minutes.  If you have to stop it for any reason or it fails to load, then it is best to restart your PC. We have to do this because MapCal does not close down properly when you close it or it closes itself.

Once the image loads it asks for info on the chart info. If this screen does not show, then click Edit / Chart Info.


Then put the cross hairs in a corner and right click, then enter the lat Lon, then do the other 3 corners and Save. It will write a file called CHARTCAL.DIR in the same folder it found the image file. See video below for examples. This file can be viewed in Notepad, if desired.

Step 2. Now we make the header file from CHARTCAL.DIR.

In the Windows search field bottom left, type cmd, then click Command prompt and a window shows up, with the user showing. Then type "CD Desktop\IMGKAP_files" and press enter.  You should see something like

C:\Users\macdavid\Desktop\IMGKAP_files>

If you make a mistake, use up arrow to repeat, then backspace as needed, fix it, then right space to the end and enter.

Then type mc2bsbh.exe CHARTCAL.DIR and press enter

You will have

C:\Users\macdavid\Desktop\IMGKAP_files>mc2bsbh.exe CHARTCAL.DIR

This will create a file called 13205TR.hdr in the same folder. This file can be viewed in Notepad, if desired.

Now go the folder now and rename that file to 13205TR-hdr.kap

Step 3. Now we combine header and image to make the KAP file using imgkap

In the same cmd line
C:\Users\macdavid\Desktop\IMGKAP_files>

Now type imgkap.exe 13205TR.png  13205TR-hdr.kap  to see this

C:\Users\macdavid\Desktop\IMGKAP_files>13205TR.png  13205TR-hdr.kap

Press enter and this will create the chart as 13205TR.kap, which is ready to load into any echart program.  Below is a video illustrating this process.

Making KAP file with imgkap.exe

Wednesday, December 11, 2019

The 2020 Air Almanac

Just as we published a short booklet on the use of the USNO's Air Almanac, it became apparent that the 2020 edition was not available now in the second week of December, long past its expected date, which is typically Oct or so of the preceding year. Coincidentally at about this time, Oct, 2019, the USNO announced they were taking down their website for six months!  This was a radical announcement, not at all in line with normal ways to update a popular web site. We can only conclude that they discovered issues that needed immediate attention, which in turn will take some time to correct.


In any event, the question came up of whether the USNO website downtime issue has anything to do with the delay in the publication of the 2020 edition? Readers had posted to this blog that they had word from USNO that the issue would be out by mid November, but now well into December it was not there—where "there" is the Government Bookstore, which has served as both a place to buy the book on a CD or to download it as a free PDF file.  We now have some answers to this situation.

First, the Almanac was indeed likely completed by mid November, but we learned that the Gov Bookstore did not order very many of these and they sold out immediately. They are also for sale at Amazon, which had them for a short time available at $28, same price as the Bookstore, with a note that they were backordered. Today we look and they are for sale at Amazon (this is a CD containing the free PDF) for $28.68 with $5.87 shipping. These are being sold on Amazon by the US Gov Bookstore!

We did learn today that the USNO has sent the Bookstore more copies of the CD, which, based on the Amazon availability, looks like they have, but they are not showing up yet on the Bookstore site itself.

Furthermore, we also learn that the Bookstore may be reevaluating their long standing policy of offering a CD copy of the book for $28 alongside an identical icon offering a free download of the same PDF. It could be someone in the marketing department looked at this and scratched their head.  In any event, we will have to wait and see what happens, but can rest assured that the book exists and will soon be available to all.

Note added Dec 15, 2019:  We can confirm that the 2020 edition has been produced but is not yet on the Gov Bookstore site. We expect it to be there shortly where it will sell as a CD for $28. It is not clear yet, if the free PDF download will be there. We will update this note when we know. In passing, the CD version (which we have in hand) is not just a copy of the 48-MB single PDF we could download for earlier years, but rather it is a combination of 53 separate PDF files along with 7 HTML web pages that serve as an index to the parts.

The absence of the USNO website for another 5 months or so could eventually be an issue. Apparently the USNO did offer the PDF download themselves, though I had not seen that, thinking the only source was the Gov Bookstore, but if the Bookstore decides to stop hosting the free PDF and the USNO site stays down, then we are in store for alternative sources.  We have a CD copy on the way to us and will make the PDF available when it arrives, if is not available elsewhere by then.

Our booklet on the Use of the Air Almanac is now available... hopefully not just in time for the demise of the Air Almanac!


Update Dec 15, 2019.
The 2020 Air Almanac is now available online compliments of the NavList Discussion Forum.

Friday, December 6, 2019

Plotting Text or Voice Weather Reports

If we lose our ability to get weather maps underway, it is likely we will still have voice reports, because we can get these with a portable SW radio. The procedure then would be to tape record the broadcast so you can transcribe it with double checks. Then to get a feeling for what it means for your part of the ocean, it is best to plot it out on a chart or plotting sheet in some form. This is an exercise in doing that, which also nicely illustrates a point we make many times in the course. Namely you will always learn something about the weather map from the text report, and you will always learn something about the text report from the weather map.

In this exercise we are preparing for not having both, but it will show why you should take both whenever you can and compare them. These days many mariners are skipping over any type of analysis they can do on their own (ie not learning it) and relying on the GFS model wind predictions (GRIB files). Chances are, this will serve their needs in many cases, but if when decisions are crucial ones, it pays to do the best you can on interpreting the forecasts you get. Remember there will always be a forecast, and they are not marked good or bad. The background in this exercise is a step toward learning more about the forecast.

We start with the basic report below, which we downloaded from the Internet, but this is what you would hear from the USCG relay of the high seas report over HF frequencies, 4 times a day. I will insert comments in italics and then color code some parts.

There are three sections to these reports, WARNINGS, SYNOPSES, and FORECASTS. Unfortunately, these three components of the report are seemingly separated in some parts (though not really) and other places mixed together, so we have to read the reports carefully. A highlight marker or two can help sort things out when you have a printed report. When transcribing from voice reports you have to be even more careful in what you write down, then get out the highlight markers.

We will leave the text files just as you would download them or receive by Navtex, since part of the task is always interpreting what is given to you. Navtex is another way to get the text files at sea. Navtex is broadcast on AM frequencies, from coastal stations. You can also get some of these by sat phone downloads and any of the text reports can also be obtained by email. See our articles and discussion of NWS FTPmail.

Annotated High Seas Text/Voice Report

HIGH SEAS FORECAST FOR METAREA IV
NWS OCEAN PREDICTION CENTER WASHINGTON DC
1630 UTC SUN JUL 04 2010
This tells us when the forecast was made and by whom (OPC), but not yet the crucial time of when it is valid. The concecpt of Metarea is valuable. We have lists and diagrams of them in the course. They are another way to specify the regions where the forecasts apply. You can, for example, get this same text report by simply typing “Metarea IV” into Google, which will find for you a World Meterological Organization (WMO) site that gives weather reports by metarea. That link will also give you the Navtex stations that broadcast the report. This report actually does not cover all of Metarea IV, but all of this region covered lies within Metarea IV.

CCODE/1:31:04:01:00/AOW/NWS/CCODE
SUPERSEDED BY NEXT ISSUANCE IN 6 HOURS
Text/voice reports are issued 4 times a day, just like the weather maps... and we shall see they are valid at the synoptic times. (C-Codes are instructions to the Inmarsat SafetyNet system on the nature of the message.)

SEAS GIVEN AS SIGNIFICANT WAVE HEIGHT...WHICH IS THE AVERAGE
HEIGHT OF THE HIGHEST 1/3 OF THE WAVES. INDIVIDUAL WAVES MAY
BE MORE THAN TWICE THE SIGNIFICANT WAVE HEIGHT
We have in the course a table that explains in detail the statistics related to SWH. Note, however, that they first use the word “seas” then switch to “waves” without any explanation. This is not very tidy. We have to refer to the NWS glossary (linked in WXTL) and only hope they are using their own terms. Namely: seas are combined seas made up of swells and wind waves.

SECURITE
This line is proof that this is indeed a transcript of something that is broadcast over the radio, because it is a radio announcement (pronounced ‘say cur eh tay’) marking the broadcast as important to navigation. The other such announcements are mayday (an emergency needing immediate help) and pan pan (meaning an important announcement about navigation that might be a hazard to you).

NORTH ATLANTIC NORTH OF 31N TO 67N AND WEST OF 35W
This line defines the region covered by the present report, and we note from this that it is not really the full metarea iv, which is defined as “The western part of the North Atlantic Ocean eastwards of the North American coast to 35°W, from 7°N to 67°N, including the Gulf of Mexico and Caribbean Sea.” So this high seas report is skipping the southern parts covered by the National Hurricane Center.

SYNOPSIS VALID 1200 UTC JUL 04.
24 HOUR FORECAST VALID 1200 UTC JUL 05.
48 HOUR FORECAST VALID 1200 UTC JUL 06.
These are the crucial times we need to know as to when the data are valid. Notice that this report was released (1630) 4h 30m after the valid time of the synopsis.

.WARNINGS.
Which includes Warnings in the Synopsis and Warnings in the Forecasts. The synopsis parts (which apply to the 12z map) have been marked in green. In each of the sections to follow there will be a note on the synopsis, which is a description of the surface analysis map valid at 12z, followed by how certain features will change in the next 24h and then 48h. The times of these forecasts are given above. There is, at least in this example, a dot before the forecast lines. 

The next page should be printed to compare with the maps that follow.

...GALE WARNING...
.LOW 39N59W 1013 MB MOVING NE 10 KT. WITHIN 480 NM SE AND E
QUADRANTS WINDS 20 TO 30 KT. SEAS TO 9 FT.
.24 HOUR FORECAST LOW DISSIPATED. WITHIN 360 NM SE AND E OF A
FRONT TO EXTEND FROM 49N35W TO 43N53W TO 31N56W WINDS 25 TO 35
KT. SEAS 9 TO 12 FT.
.48 HOUR FORECAST FROM 43N TO 46N E OF 43W WINDS TO 25 KT. SEAS
TO 9 FT.

...GALE WARNING...
.LOW 56N49W 1003 MB MOVING NE 15 KT. BETWEEN 120 NM AND 480 NM S
AND SE QUADRANTS WINDS 20 TO 30 KT. SEAS TO 9 FT.
.24 HOUR FORECAST LOW 58N43W 1002 MB. WITHIN 240 NM NW AND 540
NM SW QUADRANTS WINDS 20 TO 30 KT. SEAS TO 10 FT.
.48 HOUR FORECAST LOW E OF AREA NEAR 58N21W 999 MB. OVER
FORECAST WATERS WITHIN 780 NM W QUADRANT WINDS 25 TO 35 KT. SEAS
8 TO 14 FT.

.SYNOPSIS AND FORECAST.

.WITHIN 120 NM NW OF A LINE FROM 42N66W TO 47N55W WINDS TO 25
KT. SEAS TO 8 FT.
.24 HOUR FORECAST NEW LOW 43N65W 1012 MB. WITHIN 300 NM SW
QUADRANT WINDS TO 25 KT. SEAS LESS THAN 8 FT.
.48 HOUR FORECAST LOW DISSIPATED. FROM 37N TO 42N BETWEEN 51W
AND 48W WINDS 20 TO 30 KT. SEAS TO 8 FT.

.48 HOUR FORECAST WITHIN 120 NM W OF A LINE FROM 60N60W TO
52N52W WINDS TO 25 KT. SEAS TO 8 FT.

.DENSE FOG VSBY OCCASIONALLY LESS THAN 1 NM FROM 49N TO 54N56W
AND 48W AND FROM 40N TO 44N BETWEEN 55W AND 37W.
.24 HOUR FORECAST DENSE FOG FROM 41N TO 51N E OF 55W.
.48 HOUR FORECAST CONDITIONS IMPROVED.

.HIGH 34N81W 1021 MB MOVING SE 10 KT. (This is not plotted in Fig 1.)
.24 HOUR FORECAST HIGH 33N69W 1021 MB.
.48 HOUR FORECAST HIGH DISSIPATED.

.24 HOUR FORECAST HIGH 54N60W 1022 MB.
.48 HOUR FORECAST HIGH 49N47W 1026 MB.

.FORECASTER MUSONDA. OCEAN PREDICTION CENTER.

----------------

The synopsis part of this corresponding to the 12z map is shown in Fig 1 plotted on a Universal Plotting Sheet followed by the actual map with the plot overlaid on it.

After that are the maps from 24h and for 48h so you can compare the text with the maps.


Figure 1. Plot of the synopsis notes (shown in green on earlier pages) from a voice/text report using a universal plotting sheet. This is compared to the actual surface analysis map that was issued for this same time, 12z July 4, 2010 for western North Atlantic. Universal plotting sheets are used in celestial navigation, but have many applications to weather as well. You can do even better if you have some blank ocean plotting sheets at some valid projection. This is rather a distortion of the projection using plotting sheets this way. We have blank ocean plotting sheets online at www.starpath.com. See also the nice tracking sheets available from the NHC.

Note the special terms. The E quadrant is 045 to 135T; the SE quadrant is 090 to 180. So if you say E and S quadrants, you refer to a zone from 045 to 180, etc.


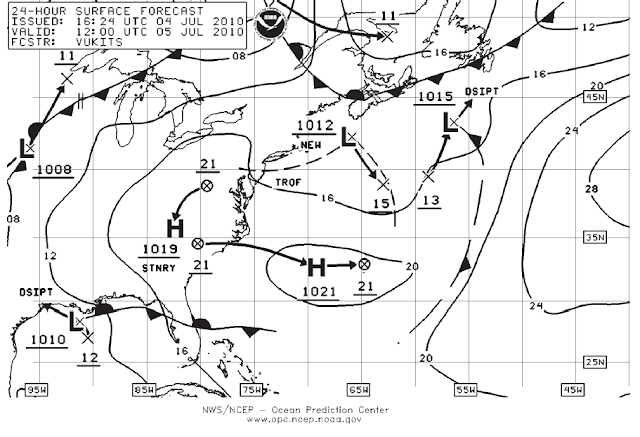
Figure 2. Surface analysis, valid 12z, made at 14:57UTC, by same forecaster. The discussion of the text report is fresher, in that it was made at 1640 which is 90 minutes later. He may have had more to look at then, as there are some differences. Namely he does not mention the front in the synopsis probably because there is not much wind with it at the time, but this does become a factor in the forecasts. Also he was likely looking at satellite photos as his description of the fog does not match exactly what we see in the ship reports—the small horizontal lines are fog reports. Notice that we learn from the text reports about the fog NE of Newfoundland, as that was not indicated in the map.

This is clearly a complex map with a lot going on and changing. But the text report has highlighted the key locations of strong wind, and if you compare to the forecasts and make similar pictures, you will see how things are evolving. 

For now we leave it as an exercise to compare the forecast text reports with the maps give, and to compare the text reports with the GFS GRIB data for the same 3 times, ie 12z, +24H, +48h. These pictures are on the following pages.


Figure 3. Above: GFS model output for 12z, July 4, 2010 to compare with earlier pictures. Below: The corresponding map from NWS, repeated from previous page.


Figure 4. Above: GFS model output for 12z, July 5, 2010 to compare with earlier pictures. This would be the 24 forecast. The blue is forecasted precipitation. Compare these with the voice forecast from July 4, i.e., print them out and plot the forecasted winds on top of them.


Figure 5. Above: NWS 48-hr forecast map valid 12z, july 6, 2010 to compare with earlier pictures. Below: The corresponding GFS model forecast in GRIB format. As an exercise, plot in the predictions from the July 4 voice/text report on these maps.