Monday, December 23, 2019

Options for Missing USNO Cel Nav Data

Update added 9/28/22. USNO site is back on the air, 2 years later, not 6 months. You can get to it with www.starpath.com/usno. We leave these notes as they still look over various ways to get cel nav data online.

On Oct 24, the USNO announced that they are shutting down their USNO web site for 6 months. We can only conclude that they discovered issues that needed immediate attention, maybe security related, and that it would take that long to repair or rebuild.


Those who study cel nav had an immediate giant hole in their resources, particularly with the missing Celestial Navigation Data page. We have described this page in various places as the "celestial navigator's dream machine," because with a very clean input it outputs all we need to analyze a set of sextant sights, either for real navigation, or, much more often, for practice or analysis.

We have relied on this USNO source for years in our teaching; many of our exercises and quiz answers call on it for quick reference. Consequently, we need at least a temporary replacement, which has led to this note.

Here is a sample input page from the now missing USNO site, followed by a couple random sample output pages.


Input is just Lat, Lon, and time.

This input page and the following output pages are random, in that I just looked through my computer for samples that I had saved for one reason or another. The site is offline, so these sample are not related to each other.  The marked data must have had some meaning at the time. A couple output pages:


This one just shows the first few because I had cut it off, and did not save the full output.
This is the full output for this time and location.  We will use this output to compare with what we can get at the moment from other sources. I do not know why Mars and Markab were marked at the time, but we can use those two data points going forward.

Note all of what we get. The Dec and GHA, telling us where the body was at the moment. These are equivalent to the Lat and Lon on earth where the body would be directly overhead at that time.  Then we get the height of the body above the horizon (Hc), and the true bearing to the body at that time (Zn).

Those computed values are the ideal answers, meaning height of the center of the object with no atmosphere. The numbers on the right show how much atmospheric refraction and the size (sun and moon) affect what we measure with the sextant. We also have to correct for our height of eye and sextant index error, but these are unique to us and not to the astro data. In short, this page served as both a Nautical Almanac and a set of Sight Reduction Tables.  

This type of data provides ideal cel nav practice. We could, for example, just look at this list and pull out these sights:
and then assume that these are the three sights we obtained on that date at that time. Then we carry out normal cel nav sight reduction and plotting to see how close we were to 45º 00'N, 137º 00' W. Note we are assuming here all Ho, observed height, which have the various sextant and altitude corrections removed. You can do this for any ocean, any time and date, sun, moon, stars, and planets, i.e., a dream machine for learning cel nav.

Well... this is gone for a while, but there are other resources that fill the gap, at least in large part. 
One such online resource that we can recommend is the fine work of Bill Ritchie, called Astron. It is a full function celestial navigation utility accessible online, including an output similar to what was given by the USNO site. The input page is shown below, set up to duplicate the data shown above that we had captured from the USNO earlier this year.


This resource offers much more than a list of available bodies, but for now we are looking at only that one feature, which we find under the Almanac Tab on the bottom, shown below.


The presentation is similar, but Astron also includes bodies that are below the horizon at the selected time. "Azm" is the azimuth (Zn). A check will show they are the same final data, just presented differently. We do not get the altitude corrections that the USNO site provided, but these are needed less often than the rest of the data. 

If specific altitude corrections are needed to make more specific practice problems and you do not have an almanac that they can be determined from, you can get these corrections from Stan Klein's PC program Celestial Tools. This free Windows program will also provide a list of bodies available at any time, date, and location, and, like Astron, also has many other valuable functions.

Another excellent full-function online cel nav resource has been created by Jorrit Visser called CelestialNavigation.nl.  Here is his presentation for the same sample date and time, found under the tab Celestial Navigation Data, the same name used at the USNO.


This utility seems to impose a minimum altitude of 10º above the horizon, which is generally a good idea, but maybe not for this type of display. It does not limit high sights. See related notes below.

Again, this is just one display option from this versatile online cel nav program, which also includes lunar distance computations.

A bigger limitation on this resource is it only goes back 3 years, and very often we refer to such a reference to check historic data.
_________

I should also mention our own StarPilot program can of course make this list as well, the most direct being from within the Sight Planner routine, which generates the display shown below. These computations do not have time limits, but we must be aware of calendar changes on early data, plus  some limitations on very old moon data—1582 would be a practical limit on the almanac data.


In this display we get a list of bodies above the horizon, accounting for several user-selected filters. First we set minimum brightness, 2.0 in this example, and we set minimum and maximum altitudes, which is above 10º and below 80º in this example. These height limits improve the final fix accuracy in many cases. See related note.

We can display a list of the bodies, which can be exported to a txt file, or we can display the sequence of best triads of bodies for optimum accuracy. The practice example proposed above was from this computation. This customizable best-sights function is a unique feature of StarPilot. Then as you click the screen you step through the optional triads, marked graphically.  This program includes many unique cel nav computations and predictions, as well as being state of the art in piloting computations, which are used many times daily on a typical voyage on inland or coastal waters.

______________

Note added on May 1, 2020.  The April 30 date they proposed for the new website has come and gone, and no USNO website yet.  This could be covid related. We do see on another part of the USNO site this new notice:


Thursday, December 19, 2019

Who Is Ahead in an Ocean Race?

In a typical ocean yacht race there is a daily position report from all vessels giving their position at some predetermined time, sometimes along with wind and pressure. A key job of the navigator is to analyze these relative positions to see how the race is progressing, and who is doing what. In the old days, I would do this with a universal plotting sheet and compute great circle and other distances with a hand held calculator. Looking over the discussion of this topic in our Weather Trainer program, I discovered some of the old school discussion was still there, which has led to this note—and an update of that topic in the program. These days we have better tools... although there can still be virtues to doing this by hand on a plotting sheet or paper chart.

These days using tactical navigation programs, we have several new options, including just plotting all the positions we care about right in the main navigation program we are using, or we could run a separate nav program for this purpose, even in a separate computer. You could, for example, be doing your primary weather routing with Expedition or Deckman, and use something like OpenCPN for a running log of vessel positions and related analysis. This has the virtue of allowing two people to work on the navigation at the same time, plus it allows for more experimental plotting and evaluation without tying up the main nav computer or risking confusing anything.  I will do this example here using OpenCPN. At the end here we look at even more automated methods.

For a real world example, we use two days of reports from the 2014 Vic-Maui Race. Other than looking for some data online, this is otherwise a random choice. Then we just went a couple days into the race and said we will use Division C, looking at July 7 and July 8. The relative positions of these two days are shown below.


The top cluster is the July 7 reports, below it the July 8 reports, along with a great circle (GC) route to Maui—although that is not at all the intended route of any vessel at this stage, which is typically  more toward something like 40N, 130W to get around the Pacific High.

To see how this works on your own you should be able to take any race, any division, and any two days. These data are shown below.

When the data is received over the radio, it is usually recorded in forms that are part of the race packet. Once the data are recorded, we then transfer them to a chart, plotting sheet, spreadsheet, or as in this case, we plot the positions in OpenCPN.

On July 7 at check in time, we only know what is in the top report.  These are plotted below and for this exercise, we assume we are the vessel Passpartout.


Our own (pretend!) vessel position is marked by a star. From this position we compute the initial heading of the GC route to the finish line, and draw that in red, about 233 T in this case. Then we construct with the route tool a line perpendicular to that GC heading, also shown in red here. This gives us a quick look at relative positions. All vessels on the red line are same distance from the finish.

We see that Turnagain is 6.6 nmi ahead of us, and Turicum is 19.4 nmi ahead of us, and the other two are rather far behind, 32.5 nmi and 57.2. With only one day of reports, we do not yet know of routes and speeds, however, we do know one important thing: we are the southernmost boat. In this race at this point, that could be an advantage.  But now we just have to see how things progress by looking at July 8.


Now we can see what the fleet has been doing by just making a route between day 7 and day 8 positions, and divide by 24 to get SMG. Zooming in on Day 8 we see the following.


Turnagain remains ahead of us, but we are sailing same SMG (8.0 kts) and we have gained 2.1 nmi on them (6.6 to 4.5) This is because for now we are sailing closer to the GC heading; they are sailing about 9º lower, more to the south.

 We can't rely on the true wind reports given—notice they are all over the board in the reports—but we do know the wind has been N-NW, and they are sailing lower and making the same 8 kts.... and so on.  This is the type of analysis one can do with these plots.

Another way to do this is to enter the daily reports in a programmed spreadsheet and have it auto compute all you care about. You know the destination, so you can compute GC distances do go for every vessel and then compare that to your GC distance, which will directly tell you who is ahead and by how much. With this system you can fold in ratings for a true output of the race status. You can also of course compute SMG and CMG for each, vessel.  This can all be set up and tested before the race. Nevertheless, there can still be virtue in seeing how the routes compare graphically.

You also likely know at some point the speed potential of your competitors, so if a SMG seems to low, and the CMG too high or too low, then you know they have likely jibed during that route. It appears in this case that Turicum  had jibed during these past 24 hr.  Recall when we draw in that line this is only course made good, we do not know the actual track taken. This is why jibes might be carried out right after checking in whenever tactically feasible so they have the biggest impact, before giving away that you have jibed.

More modern methods are even more intense! Several companies offer vessel tracking services with vessel positions posted online providing a wonderful way for spectators to follow the race. These services are popular with cruising sailors as well, offering a way for friends and family to follow along the voyage. Tracked positions are updated typically every hour, but in some cases like the Swiftsure Race plot shown below, they are essentially live data at the time of the race. These data are then often archived to be viewed later on.


This is early in the 2019 race, picture compliments of Andrew Haliburton, who was navigating Riva, the leading boat at this time.

These tracking services were originally intended for spectators, but there is cell phone coverage over the full 80 nmi of this race course (along the Strait of Juan de Fuca between Washington state and BC, Canada), and anyone can download the positions—on land, or on the water taking part in the race. This gives a very nice near real time snapshot of who is doing what, but you would have to do custom programming to capture the data digitally.

For ocean races there is no cell phone connections, but we still have satphones and Iridium Go devices that can be used to load any internet webpage, but albeit at very slow and expensive rates. Most large races have some internet coverage for spectators, with YB Tracking (formerly "Yellow Brick") being one of the world leaders in this service. Again, this was originally intended for spectators at home, but it is not illegal to access this from your boat at sea if you are willing to spend the money to do so.

YB race positions are typically updated every hour at a specific time, so you can set your watch to remind you when there are new data. This way you get to see all the positions laid out on an hourly basis so you know what your competitors are doing.

Sophisticated racing software such Expedition and Deckman have access to the YB database built right into the programs and anticipating this, the racing instructions often include the link to the data along with the ID of the race. Here, for example, is section 10.3 from the 2019 Sydeny Hobart Sailing Instructions

10.3 RRS 41: Further to NoR 7.3(a), Whilst racing a boat may retrieve data from the standings pages of the event website or from https://www.rolexsydneyhobart.com/standings/lite or from the text-based feeds provided at https://yb.tl/Links/rolexs2h2019.

In Expedition, this service is accessed via the Sail tab:


Below are a couple sample Expedition YB tracking plots from the 2019 Sydney Hobart Race.


The popups do not all happen at once in Expedition. These are from two different tabs; the sailing tab showing tracking data, and the weather tab showing GRIB data. 

With this type of near live information, the navigator knows what each is doing and conditions at their location. If you have polars for your competitors you can compute optimal routes for them as well... at each stage thinking over what you can do that would be smarter than what the competitors might do.

Expedition has a Scheduler function that can be set to update the tracking automatically. These data in this race are updated every 10 minutes. Then the user just presses the Sync Time button and the latest tracking is shown along with the right wind data for that time.  There are no more secret jibes.

This kind of tracking option is one of the major changes in yacht racing over the past few years. Another one on the horizon appears to be how outside assistance with regard to weather data will be defined. An interesting new topic!


Sunday, December 15, 2019

How to Make an RNC eChart From a Chart Image

Of the several earlier notes (and videos) we have on this process, this note here effectively outdates all the earlier ones.

 A typical raster navigational chart (RNC) is composed of two files. One with extension .KAP and one with .BSB. The latter is a text file including metadata about the chart and the region it covers. The former is the formatted image file of the chart itself. The format originally developed by MapTech is discussed here. The .KAP file is unusual in that it has a readable multi-line ascii text section followed by the binary image code.

This subject may have some renewed interest in the future in that NOAA will be discontinuing paper charts and the RNC echarts made from them. Also of note, is Google Earth has recently changed their policy and now offers a standard mercator projection of the earth, which means we can make our own nautical charts more easily this way now for regions that might not be well charted.

Using OpenCPN Weatherfax Plugin

I know of two ways to make the KAP files. One is use OpenCPN weatherfax (wefax) plugin; the other uses three free PC utilities. The wefax method is very easy and takes just a minute or two. The only disadvantage to this method is that (for the time being) you cannot specify the units if they are feet and other metadata cannot be edited. This means the scale will be reported incorrect and the depth units could be wrong if native units are feet. However, if you can overlook those factors and just need a chart that looks good and is properly georeferenced, that can be passed on to others, then the OpenCPN wefax method is the way to go. It is explained in the short video below. This  method is limited to image files of about 40 MB, but that should not be restrictive.

  Making KAP file with OpenCPN wefax plugin     

If we want to get the chart metadata correct so that it reports properly on the chart, then we have a longer process, but still direct once the prescription is known, which we outline here. This procedure is explained online in various formats, so this is just a local rewording and a focus on only one of several variations. To read other descriptions, search the Cruisers Forum, OpenCPN section, on ImgKap.

Using ImgKap.exe

I have earlier notes and videos on this process, but they are more complex than needed as they  calibrate the images manually and then create the header files manually as well. Here we use two utilities to do that.  For now we look at using ImgKap.exe directly, streamlined as best I can do. Again, there may be other, easier ways.

To accomplish this we need 3 free PC programs, used in this order:

    MapCal_2.exe (1.2 MB, 2/17/2013)
    mc2bsbh.exe (0.23 MB, 3/15/2010)
    imgkap.exe (3.6 MB, 1/24/2016)

The first has a normal PC windows user interface, but the second two must be run from a Windows command line, which is not familiar process to all, so we outline the steps and provide a video demo.

MapCal_2.exe is used to georeference the chart image. It is not downloaded directly, but obtained by downloading and installing an echart program called Sea Clear II that is available at http://www.sping.com/seaclear. After installing the program, look in c:\Program Files (x86) and you will see the program. You can run it from there or copy it to move to the folder we will use.  It does not require other components.  Sea Clear is a program that was way ahead of its time; this was a function it included that let you make charts out of any image. The charts it makes, however, only work in Sea Clear, and now as time has passed we have OpenCPN as a more versatile tool. But we fall back here to use a Sea Clear utility. This function creates a calibration file called CHARTCAL.DAT.

mc2bsbh.exe stands for MapCal to BSB chart header.  We use it to make the metadata part of the KAP file from the output of MapCal. You can download mc2bsbh at http://www.dacust.com/inlandwaters/mapcal along with instructions for its use, but these will be summarized here. Note that there are other proposed ways to do this at that site, including links to things that are supposed to make it easier, but I have not figured out how to use those properly, so I proceed with this basic approach. This function uses the calibration file CHARTCAL.DAT to create a header_file.hdr.

imgkap.exe is the main tool for putting the header file with the image file to make the KAP file. This is the main tool in that in principle we could calibrate the image manually and also create the header file manually without the first two utilities, but that is tedious and prone to error.  You can download imgkap at http://www.dacust.com/inlandwaters/imgkap (I used to have articles and videos on those two steps, but this note replaces all of those. In retrospect, it is almost comical how complex those early notes are! They were made before I learned of other options.)

Procedure (text followed by a video)

Step 1. Download your chart or other image and trim it to the area you want. The stock MS Paint is one way to do that on a PC. Then consider the size. We want it as small as possible that meets your needs. So zoom in on some section to see what it looks like, then duplicate it and reduce it by 50% and look again. MapCal will take things as large at 60 or 70 MB but it takes a while for it to load.

We will use a samples of training charts that we get at https://historicalcharts.noaa.gov. At the bottom of the page, select "training charts," and search. We already have online 18465TR, 1210TR and 12221TR. For now we will do Block Island Sound 13205TR. These native files are about 35 MB in JPG format.

Use MS Paint or other program to convert this to a .PNG file, which is what MapCal needs.  We start with 13205TR-05-1991.JPG (34.7 MB, 14,000 x 17500 pixels, at 350 dpi) then convert to PNG and change the file name to what you want your chart file to be called, in our case 13205TR.PNG (129.7 MB), which is too big, so reduce by 50% to get 13205TR.PNG (39.8 MB).

Now make a folder on your desktop called "IMGKAP_files" and put all three programs you need into it along with the image file itself. (You can go to program files (x86) and copy mapcal_2 to copy here.)

Now open MapCal and then choose open file and load your PNG image into MacCal and note it will take awhile to load. It may say program not responding, but just wait. This size takes about  3 minutes.  If you have to stop it for any reason or it fails to load, then it is best to restart your PC. We have to do this because MapCal does not close down properly when you close it or it closes itself.

Once the image loads it asks for info on the chart info. If this screen does not show, then click Edit / Chart Info.


Then put the cross hairs in a corner and right click, then enter the lat Lon, then do the other 3 corners and Save. It will write a file called CHARTCAL.DIR in the same folder it found the image file. See video below for examples. This file can be viewed in Notepad, if desired.

Step 2. Now we make the header file from CHARTCAL.DIR.

In the Windows search field bottom left, type cmd, then click Command prompt and a window shows up, with the user showing. Then type "CD Desktop\IMGKAP_files" and press enter.  You should see something like

C:\Users\macdavid\Desktop\IMGKAP_files>

If you make a mistake, use up arrow to repeat, then backspace as needed, fix it, then right space to the end and enter.

Then type mc2bsbh.exe CHARTCAL.DIR and press enter

You will have

C:\Users\macdavid\Desktop\IMGKAP_files>mc2bsbh.exe CHARTCAL.DIR

This will create a file called 13205TR.hdr in the same folder. This file can be viewed in Notepad, if desired.

Now go the folder now and rename that file to 13205TR-hdr.kap

Step 3. Now we combine header and image to make the KAP file using imgkap

In the same cmd line
C:\Users\macdavid\Desktop\IMGKAP_files>

Now type imgkap.exe 13205TR.png  13205TR-hdr.kap  to see this

C:\Users\macdavid\Desktop\IMGKAP_files>13205TR.png  13205TR-hdr.kap

Press enter and this will create the chart as 13205TR.kap, which is ready to load into any echart program.  Below is a video illustrating this process.

Making KAP file with imgkap.exe

Wednesday, December 11, 2019

The 2020 Air Almanac

Just as we published a short booklet on the use of the USNO's Air Almanac, it became apparent that the 2020 edition was not available now in the second week of December, long past its expected date, which is typically Oct or so of the preceding year. Coincidentally at about this time, Oct, 2019, the USNO announced they were taking down their website for six months!  This was a radical announcement, not at all in line with normal ways to update a popular web site. We can only conclude that they discovered issues that needed immediate attention, which in turn will take some time to correct.


In any event, the question came up of whether the USNO website downtime issue has anything to do with the delay in the publication of the 2020 edition? Readers had posted to this blog that they had word from USNO that the issue would be out by mid November, but now well into December it was not there—where "there" is the Government Bookstore, which has served as both a place to buy the book on a CD or to download it as a free PDF file.  We now have some answers to this situation.

First, the Almanac was indeed likely completed by mid November, but we learned that the Gov Bookstore did not order very many of these and they sold out immediately. They are also for sale at Amazon, which had them for a short time available at $28, same price as the Bookstore, with a note that they were backordered. Today we look and they are for sale at Amazon (this is a CD containing the free PDF) for $28.68 with $5.87 shipping. These are being sold on Amazon by the US Gov Bookstore!

We did learn today that the USNO has sent the Bookstore more copies of the CD, which, based on the Amazon availability, looks like they have, but they are not showing up yet on the Bookstore site itself.

Furthermore, we also learn that the Bookstore may be reevaluating their long standing policy of offering a CD copy of the book for $28 alongside an identical icon offering a free download of the same PDF. It could be someone in the marketing department looked at this and scratched their head.  In any event, we will have to wait and see what happens, but can rest assured that the book exists and will soon be available to all.

Note added Dec 15, 2019:  We can confirm that the 2020 edition has been produced but is not yet on the Gov Bookstore site. We expect it to be there shortly where it will sell as a CD for $28. It is not clear yet, if the free PDF download will be there. We will update this note when we know. In passing, the CD version (which we have in hand) is not just a copy of the 48-MB single PDF we could download for earlier years, but rather it is a combination of 53 separate PDF files along with 7 HTML web pages that serve as an index to the parts.

The absence of the USNO website for another 5 months or so could eventually be an issue. Apparently the USNO did offer the PDF download themselves, though I had not seen that, thinking the only source was the Gov Bookstore, but if the Bookstore decides to stop hosting the free PDF and the USNO site stays down, then we are in store for alternative sources.  We have a CD copy on the way to us and will make the PDF available when it arrives, if is not available elsewhere by then.

Our booklet on the Use of the Air Almanac is now available... hopefully not just in time for the demise of the Air Almanac!


Update Dec 15, 2019.
The 2020 Air Almanac is now available online compliments of the NavList Discussion Forum.

Friday, December 6, 2019

Plotting Text or Voice Weather Reports

If we lose our ability to get weather maps underway, it is likely we will still have voice reports, because we can get these with a portable SW radio. The procedure then would be to tape record the broadcast so you can transcribe it with double checks. Then to get a feeling for what it means for your part of the ocean, it is best to plot it out on a chart or plotting sheet in some form. This is an exercise in doing that, which also nicely illustrates a point we make many times in the course. Namely you will always learn something about the weather map from the text report, and you will always learn something about the text report from the weather map.

In this exercise we are preparing for not having both, but it will show why you should take both whenever you can and compare them. These days many mariners are skipping over any type of analysis they can do on their own (ie not learning it) and relying on the GFS model wind predictions (GRIB files). Chances are, this will serve their needs in many cases, but if when decisions are crucial ones, it pays to do the best you can on interpreting the forecasts you get. Remember there will always be a forecast, and they are not marked good or bad. The background in this exercise is a step toward learning more about the forecast.

We start with the basic report below, which we downloaded from the Internet, but this is what you would hear from the USCG relay of the high seas report over HF frequencies, 4 times a day. I will insert comments in italics and then color code some parts.

There are three sections to these reports, WARNINGS, SYNOPSES, and FORECASTS. Unfortunately, these three components of the report are seemingly separated in some parts (though not really) and other places mixed together, so we have to read the reports carefully. A highlight marker or two can help sort things out when you have a printed report. When transcribing from voice reports you have to be even more careful in what you write down, then get out the highlight markers.

We will leave the text files just as you would download them or receive by Navtex, since part of the task is always interpreting what is given to you. Navtex is another way to get the text files at sea. Navtex is broadcast on AM frequencies, from coastal stations. You can also get some of these by sat phone downloads and any of the text reports can also be obtained by email. See our articles and discussion of NWS FTPmail.

Annotated High Seas Text/Voice Report

HIGH SEAS FORECAST FOR METAREA IV
NWS OCEAN PREDICTION CENTER WASHINGTON DC
1630 UTC SUN JUL 04 2010
This tells us when the forecast was made and by whom (OPC), but not yet the crucial time of when it is valid. The concecpt of Metarea is valuable. We have lists and diagrams of them in the course. They are another way to specify the regions where the forecasts apply. You can, for example, get this same text report by simply typing “Metarea IV” into Google, which will find for you a World Meterological Organization (WMO) site that gives weather reports by metarea. That link will also give you the Navtex stations that broadcast the report. This report actually does not cover all of Metarea IV, but all of this region covered lies within Metarea IV.

CCODE/1:31:04:01:00/AOW/NWS/CCODE
SUPERSEDED BY NEXT ISSUANCE IN 6 HOURS
Text/voice reports are issued 4 times a day, just like the weather maps... and we shall see they are valid at the synoptic times. (C-Codes are instructions to the Inmarsat SafetyNet system on the nature of the message.)

SEAS GIVEN AS SIGNIFICANT WAVE HEIGHT...WHICH IS THE AVERAGE
HEIGHT OF THE HIGHEST 1/3 OF THE WAVES. INDIVIDUAL WAVES MAY
BE MORE THAN TWICE THE SIGNIFICANT WAVE HEIGHT
We have in the course a table that explains in detail the statistics related to SWH. Note, however, that they first use the word “seas” then switch to “waves” without any explanation. This is not very tidy. We have to refer to the NWS glossary (linked in WXTL) and only hope they are using their own terms. Namely: seas are combined seas made up of swells and wind waves.

SECURITE
This line is proof that this is indeed a transcript of something that is broadcast over the radio, because it is a radio announcement (pronounced ‘say cur eh tay’) marking the broadcast as important to navigation. The other such announcements are mayday (an emergency needing immediate help) and pan pan (meaning an important announcement about navigation that might be a hazard to you).

NORTH ATLANTIC NORTH OF 31N TO 67N AND WEST OF 35W
This line defines the region covered by the present report, and we note from this that it is not really the full metarea iv, which is defined as “The western part of the North Atlantic Ocean eastwards of the North American coast to 35°W, from 7°N to 67°N, including the Gulf of Mexico and Caribbean Sea.” So this high seas report is skipping the southern parts covered by the National Hurricane Center.

SYNOPSIS VALID 1200 UTC JUL 04.
24 HOUR FORECAST VALID 1200 UTC JUL 05.
48 HOUR FORECAST VALID 1200 UTC JUL 06.
These are the crucial times we need to know as to when the data are valid. Notice that this report was released (1630) 4h 30m after the valid time of the synopsis.

.WARNINGS.
Which includes Warnings in the Synopsis and Warnings in the Forecasts. The synopsis parts (which apply to the 12z map) have been marked in green. In each of the sections to follow there will be a note on the synopsis, which is a description of the surface analysis map valid at 12z, followed by how certain features will change in the next 24h and then 48h. The times of these forecasts are given above. There is, at least in this example, a dot before the forecast lines. 

The next page should be printed to compare with the maps that follow.

...GALE WARNING...
.LOW 39N59W 1013 MB MOVING NE 10 KT. WITHIN 480 NM SE AND E
QUADRANTS WINDS 20 TO 30 KT. SEAS TO 9 FT.
.24 HOUR FORECAST LOW DISSIPATED. WITHIN 360 NM SE AND E OF A
FRONT TO EXTEND FROM 49N35W TO 43N53W TO 31N56W WINDS 25 TO 35
KT. SEAS 9 TO 12 FT.
.48 HOUR FORECAST FROM 43N TO 46N E OF 43W WINDS TO 25 KT. SEAS
TO 9 FT.

...GALE WARNING...
.LOW 56N49W 1003 MB MOVING NE 15 KT. BETWEEN 120 NM AND 480 NM S
AND SE QUADRANTS WINDS 20 TO 30 KT. SEAS TO 9 FT.
.24 HOUR FORECAST LOW 58N43W 1002 MB. WITHIN 240 NM NW AND 540
NM SW QUADRANTS WINDS 20 TO 30 KT. SEAS TO 10 FT.
.48 HOUR FORECAST LOW E OF AREA NEAR 58N21W 999 MB. OVER
FORECAST WATERS WITHIN 780 NM W QUADRANT WINDS 25 TO 35 KT. SEAS
8 TO 14 FT.

.SYNOPSIS AND FORECAST.

.WITHIN 120 NM NW OF A LINE FROM 42N66W TO 47N55W WINDS TO 25
KT. SEAS TO 8 FT.
.24 HOUR FORECAST NEW LOW 43N65W 1012 MB. WITHIN 300 NM SW
QUADRANT WINDS TO 25 KT. SEAS LESS THAN 8 FT.
.48 HOUR FORECAST LOW DISSIPATED. FROM 37N TO 42N BETWEEN 51W
AND 48W WINDS 20 TO 30 KT. SEAS TO 8 FT.

.48 HOUR FORECAST WITHIN 120 NM W OF A LINE FROM 60N60W TO
52N52W WINDS TO 25 KT. SEAS TO 8 FT.

.DENSE FOG VSBY OCCASIONALLY LESS THAN 1 NM FROM 49N TO 54N56W
AND 48W AND FROM 40N TO 44N BETWEEN 55W AND 37W.
.24 HOUR FORECAST DENSE FOG FROM 41N TO 51N E OF 55W.
.48 HOUR FORECAST CONDITIONS IMPROVED.

.HIGH 34N81W 1021 MB MOVING SE 10 KT. (This is not plotted in Fig 1.)
.24 HOUR FORECAST HIGH 33N69W 1021 MB.
.48 HOUR FORECAST HIGH DISSIPATED.

.24 HOUR FORECAST HIGH 54N60W 1022 MB.
.48 HOUR FORECAST HIGH 49N47W 1026 MB.

.FORECASTER MUSONDA. OCEAN PREDICTION CENTER.

----------------

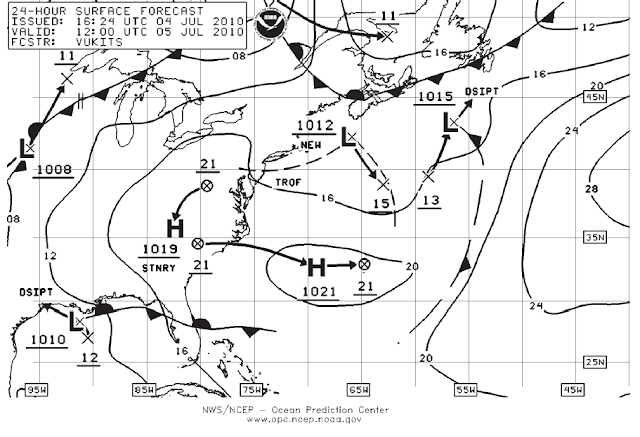
The synopsis part of this corresponding to the 12z map is shown in Fig 1 plotted on a Universal Plotting Sheet followed by the actual map with the plot overlaid on it.

After that are the maps from 24h and for 48h so you can compare the text with the maps.


Figure 1. Plot of the synopsis notes (shown in green on earlier pages) from a voice/text report using a universal plotting sheet. This is compared to the actual surface analysis map that was issued for this same time, 12z July 4, 2010 for western North Atlantic. Universal plotting sheets are used in celestial navigation, but have many applications to weather as well. You can do even better if you have some blank ocean plotting sheets at some valid projection. This is rather a distortion of the projection using plotting sheets this way. We have blank ocean plotting sheets online at www.starpath.com. See also the nice tracking sheets available from the NHC.

Note the special terms. The E quadrant is 045 to 135T; the SE quadrant is 090 to 180. So if you say E and S quadrants, you refer to a zone from 045 to 180, etc.


Figure 2. Surface analysis, valid 12z, made at 14:57UTC, by same forecaster. The discussion of the text report is fresher, in that it was made at 1640 which is 90 minutes later. He may have had more to look at then, as there are some differences. Namely he does not mention the front in the synopsis probably because there is not much wind with it at the time, but this does become a factor in the forecasts. Also he was likely looking at satellite photos as his description of the fog does not match exactly what we see in the ship reports—the small horizontal lines are fog reports. Notice that we learn from the text reports about the fog NE of Newfoundland, as that was not indicated in the map.

This is clearly a complex map with a lot going on and changing. But the text report has highlighted the key locations of strong wind, and if you compare to the forecasts and make similar pictures, you will see how things are evolving. 

For now we leave it as an exercise to compare the forecast text reports with the maps give, and to compare the text reports with the GFS GRIB data for the same 3 times, ie 12z, +24H, +48h. These pictures are on the following pages.


Figure 3. Above: GFS model output for 12z, July 4, 2010 to compare with earlier pictures. Below: The corresponding map from NWS, repeated from previous page.


Figure 4. Above: GFS model output for 12z, July 5, 2010 to compare with earlier pictures. This would be the 24 forecast. The blue is forecasted precipitation. Compare these with the voice forecast from July 4, i.e., print them out and plot the forecasted winds on top of them.


Figure 5. Above: NWS 48-hr forecast map valid 12z, july 6, 2010 to compare with earlier pictures. Below: The corresponding GFS model forecast in GRIB format. As an exercise, plot in the predictions from the July 4 voice/text report on these maps.


Sunday, November 24, 2019

Navigator's Library for Extended Ocean Voyaging

Outfitting a boat for an ocean voyage, or more to the point, for extended voyaging, calls for putting together a library of resources. Many of the basic publications needed are required by law for certified commercial vessels, but that is not the guideline we apply here. Some of these books are better known than others. We assume that at least one American port is involved, and that multiple other nations will be visited as well. This library would be the same for power or sailing vessels; large or small.

Here we just make a list of sources and short descriptions. Many we can obtain as PDF files, which in turn can be stored in a tablet or computer in an ebook reader such as Kindle, ADE Reader, or Apple Books. This has the advantage of organizing the pubs, with an opportunity to add bookmarks, highlights, and annotations. (This procedure of saving references and manuals deserves another short note at some point.)

If we had to buy all of these in print it would be very expensive and take up a lot of weight and space on the vessel. Luckily most are free or inexpensive PDF documents. We also mention here some of our own publications that help with the use of these official references. 

Most of these publications have annual updates, but having any edition of each is step one. In some cases the updates are few and often cover technical details that will not affect small craft navigation.

________________

This is a topic on its own, which we address several places. There are paper charts and electronic charts. These days it is likely we carry some combination of both.

Navigation Rules Handbook
This is without doubt the most important book in navigation, which is easy to prove. A study of court cases involving collisions shows that every collision involves the violation of at least one Rule from this book by both vessels involved. In short, know and obey the rules and you will not be in a collision. This also applies to collisions with things (allisions), such as docks and land! The USCG tacked on the name "Handbook" when then expanded their version to not just include US and International Rules, but also this pub now includes full copies of all the related or referenced documents. The above link is to the official USCG PDF, which is not interactive and does not even have a table of contents. You might find the version we use in class more convenient as it has links and bookmarks, and is set up to display the correct facing pages.  Or even better, copy this html page to your desktop and use it. We call this one the Pocket NavRules Handbook, which highlights the differences between US Inland and International Rules. The Canadians have their own inland rules, called Canadian Modifications.  We strongly recommend carrying a printed copy of the nav rules on board for study and reference as needed.

Chart No. 1
Covers chart symbols used on both US and international paper charts as well as the international standards for ENC echart symbols. This book might not be needed on a daily basis for experienced navigators, but there could be a crucial question to answer about a new harbor or bay, where this could save the day. Remember the chart symbols are quite literal (two slightly different ones could have meanings quite different) and the symbols are packed full of detail.

US Coast Pilots
The basic description of these volumes is they contain the crucial information needed for navigation that is not on the nautical charts. These are required reading for navigation in US coastal waters. There are 9 volumes. Note there are several sections covering any one area, all of which should be skimmed for waters covered. And there are several general information sections which are valuable for any region.  Plus weather stats in the appendix that help with planning. Our standing suggestion to those not familiar with the books is to get the one for your own waters, and see how much you learn. We have extensive training and practice exercises on the use of Coast Pilots in our text on Inland and Coastal Navigation: For Power and Sailing Vessels.

Sailing Directions Enroute
These are the US produced counterparts of the US Coast Pilots for international waters. When you go to the source page, click the graphic index link (Sailing Directions Limits Graphic) to find the right volumes you need. These books include much of the legal details needed for entering international ports as well as the weather and navigation information. Unfortunately, the charts they list are the NGA charts that are way outdated. Some are still available from NOAA print on demand dealers, but they are 20 to 30 years old. In essence, you have to use the information in these sailing directions to update these old charts if you use them, or get new charts from other agencies.


Planning Guides
These are supplements to the US Sailing Directions. They are organized by countries along the borders of oceans covered. There is some overlap with information. The Guide info is more compacted, which offers quick access to key information and contacts, but then we need to refer to the Sailing Directions for full details.

US Light Lists
These books list all aids to navigation in US waters such as buoys, lights, daymarks, racons, and so on. They give lat lon, and crucial details of the aid, such as range, height, and brightness of lights, which is not always on the charts, or maybe chart info is outdated. Charts can be every few years; Light Lists are annual. Fundamental for navigation at night and very often valuable in the day. Like the Coast Pilots, these are must-have pubs. There are introductory and general sections with much valuable information on navigation with lights.

International Light Lists
These are the NGA international counterparts of the US Light Lists. Same description, content, and value as listed above for US Light Lists. The world in covered in 7 volumes.


International Tide Tables
The US publishes tide tables for many international stations, compiled in the above book. Note this is a unique link. I do not know where else these can be found as full-book PDFs. See also the tides and currents display of OpenCPN. It includes a version of xtides that covers international waters.


International Current Tables
This is same reference as for the international tides, but there are not nearly as many international current stations included. Best source for these will be the hydrographic offices of the nations you care about. There is a list of members with links at the IHO. See also the tides and currents display of OpenCPN. It includes a version of xtides that covers international waters.


Worldwide Marine Radiofacsimile Broadcast Schedules
This is a valuable PDF resource even for those not using HF fax. First, it shows what nations actually make real weather maps that can be used to test the model forecasts, but buried in the back of this as an appendix is the best description on how to use the NWS FTPmail program for direct email request of NWS products. The contents have changed over the years, but the file name has not, consequently we can always find this with a google search on "rfax.pdf."

Radio Navigational Aids, Pub 110
Lists times and frequencies of radio broadcasts for weather, time tics, and safety information, plus general notes on radio navigation features, including VHF channel usage in various countries, plus frequencies that can be used to request medical advice.  This is where we would find the times of HF voice weather broadcasts, for example, but we would need the previous reference (rfax.pdf) for the radiofax info.

Pilot Charts
There is one chart for each ocean for each month as PDF images. They include tremendous information such as average wind, pressures, currents, magnetic variation, storm likelihood, fog, ice, great circle routes and more. A good overview of the oceans covered. Even better are the RNC echart versions available at opencpn.org. Note that for climatic winds we are better off using the wind data from COGOW, which is based on actual satellite measurements.


International Code of Signals, Pub 102
If all of your radios are working fine, and you are communicating with a vessel who understands your language, then you may not need this reference, but failing either one, this becomes crucial for communications. It will also help you identify flags, lights, and other signals even if you do not need to communicate. PS. The flag K means "I wish to communicate." We offer a printed copy of this pub if desired.

Bowditch American Practical Navigator, Pub 9
This is the American Bible of marine navigation, available as a free PDF so it is only logical to have this extensive reference at hand. Skim over the Table of Contents to see what is there—Chapter 6 actually explains the use and value of many of the books on this list. There is in Vol 2 a valuable Glossary as well. Parts are more detailed than we might need; others are excellent presentations in basic and celestial navigation, oceanography, weather, and (increasingly) electronic navigation. Volume 2 includes many tables useful for navigation. Note that this has become a dynamic publication, where improvements or corrections are just added to the online version. It is not clear yet how subsequent changes might be noted. Older versions have much more coverage of celestial navigation, maybe peaking in the '58 or '77 editions. (An aside: In the the latest version, check out second paragraph on page 304 for a reference to the Fit-Slope Method we developed here at Starpath.)

Nautical Almanac
This is a $30 printed book for celestial navigation. It includes both the cel nav data and a set of sight reduction tables. For those who wish to learn the full line of celestial navigation, we recommend our textbook Celestial Navigation: A Complete Home Study Course. For those who do not wish to learn cel nav until it is needed, we recommend our GPS Backup With a Mark 3 Sextant and a Mark 3 Sextant, or better still, our Backup Kit that includes the book, a sextant, a rated watch, and other materials needed. You do not even have to open it until you need it and then everything is there to carry on with cel nav including instructions on how to do it.

Air Almanac (PDF)
This is a free PDF from the Government BookStore. We have a short note about it online and a short printed booklet (with ebook options) that discusses it in detail relative to the Nautical Almanac. It is for the most part redundant to the Nautical Almanac, but celestial navigators might want to save a copy of the the current year's Sky Diagrams for optimum sights selection.


US and International Radio Frequencies and Channels
We would hope that our radio manuals have all of this included, but this cannot be counted on. This information is available on several pages at the USCG Nav Center linked above. We have also put together a short file that includes an indexed list to these, along with notes on their usage, which saves a lot in both compilation time—and access time once compiled (Marine_Radio_Resource.pdf).


International Standard Time Zones of the World
In principle we have this information in the Nautical or Air Almanac, which also includes which nations use daylight saving time and when, but it is hard to beat this up-to-date beautiful presentation.


_____________

Now that we have pointed out where these documents come from, and that indeed they are mostly free products, we might note that we do have a compilation of (almost) all of them (i.e., all volumes of each resource) on a DVD called Bowditch Plus. It is a question of how much does it cost in time to put together what we need on our own, versus just purchasing the full indexed set.


Where to Get Nautical Charts

First we note that this week we got word from NOAA that they are requesting feedback on discontinuing all paper charts and RNC electronic charts in the next 5 years. The goal is to have mariners switch to all ENC charts, which has indeed been a goal for many years, internationally. With that in mind, we produced our textbook on how to use ENC called: Introduction to Electronic Chart Navigation: With an Annotated ECDIS Chart No. 1 It is unlikely that transition will take place in 5 years, but it might.


In preparation for this transition, NOAA has developed a new way for individuals to print their own paper copy of an ENC chart, even at very large sizes (trip to Kinkos), but that will be little consolation to mariners until the US gets a lot better coverage of the terrain in ENC, which is the main turnoff for paper chart users. We do not go on land with our boats, but we look at it, and it helps us stay oriented on the water. Other nations do a much better job with terrain charting in ENC than the US does. (We will add a video of that Print Custom ENC process in the near future.)

With that realtime note behind us, we go on as if nothing has changed, because nothing has.

US Charts
If we are after US charts, the solution is easy. We made a link to all online NOAA chart sources at starpath.com/getcharts. That will direct you to all RNC and ENC echarts for immediate download at no charge, and provide a list of dealers who will print any of these for you at about $27 each. There are also PDF versions of the charts. Our neighbors here in Ballard at Captains Nautical Supply can do printing, as well as our main book distributor in CA, Paradise Cay. Each takes orders online or over the phone and they mail the charts to you in a tube, usually same day or next.

International Charts
This is a bigger challenge, no matter what part of the world you live in, nor what part you plan to travel to. The reason we don't hear more about it being a problem is because many mariners have resigned to using third party charts that are compatible with their existing chart display electronics. Those more likely to confront the issue are those that use their own navigation software and have to find and add the charts themselves—or those who indeed want at least some samples of paper charts for the waters planned.

Some stand alone echart programs have automated purchase options for third party charts, even though they will run official echarts if needed with the appropriated S-63 plugins. Navionics, C-map, and ChartWorld are large popular suppliers of their own third party charts. ChartWorld is unique in that they sell all three versions.

International Paper charts
Bluewater Books in Fort Lauderdale has a large source of international paper charts from many nations (with up to two weeks delay in shipping on some). See also EastView Nautical, which seems to have the largest selection. Note that many outlets still sell the US NGA paper charts of foreign waters (printed on demand), but note that they are almost all way outdated, 20 to 30 years in most cases.

To find out what official charts actually exist, it is best to go direct to the International Hydrographic Office (IHO), and use their ENC availability page (click the picture in the middle to open it). This will show what is available. Refer to our book on ENC to understand the file naming conventions. The charts cannot be purchased here, but it shows what is available in what scales.

Sample region from the IHO ENC viewer

On the left of that page, there is a link "Backup paper charts" that takes you to a list of links to all nations that produce paper charts (International Paper Chart Catalog). Then you can go direct to these primary sources to see what they have. At this point you can then check the various outlets to find best source.

International Electronic Charts
The IHO viewer shows directly the ENC available. They are sold by several outlets both as ENC and RNC, which are the graphic images of the paper charts. Both will require an S-63 plugin to authorize these copy protected charts. The UKHO also sells charts from other nations, so any chart dealer with UKHO connections can sell these as well. Bluewater Books is one with staff on hand who are familiar with international charting. Captains Nautical Supply and Maryland Nautical Supply also are UKHO distributors.

If you use OpenCPN for echart navigation you have another attractive option for some parts of the world, namely the oe-SENC and oe-RNC from o-charts.org.  These are not technically official charts (they do not meet carriage requirements), but they are the same as the official charts and they cost much less than the official versions. We have a note on the unique aspects of this chart service.

In passing, the online Navionics chart viewer is one way to get a quick look at the extent of charting detail available globally. Theirs are third party charts, but they are on some level based on the official charts so you can see how much is known about a specific remote region.


Sunday, November 3, 2019

Sextant Sight Planning with the Air Almanac's Sky Diagrams

In a recent note we compared the Air Almanac with the Nautical Almanac, and presented ways to obtain a copy of either. A unique feature of the Air Almanac (AA) is its set of Sky Diagrams intended for planning the optimum sextant sights to take for the best fix. We are typically confronted with a sky full of stars and a planet or two, and the choices we make are crucial to optimum accuracy of the resulting fix.

Here we illustrate that selection process using the Sky Diagrams and compare it with two other methods of sight planning, Pub 249 Vol. 1 and the 2102-D Star Finder. Then for completeness, we jump into the electronic world and look at the Best Sights function of our StarPilot apps to confirm what the manual methods found.

For reference as we proceed, here is a set of the 2019 Sky Diagrams extracted from the 2019 Air Almanac, which includes the official Explanation of the diagrams. (We also have the latest annual set at our cel nav book support page.)

The Sky Diagrams are radar-like plots of the heights and bearings of all celestial bodies in the sky that we might use for a sextant sight. There is a diagram for every 2 hours of LMT for the 15th of each month of the almanac year, for latitudes 50S, 25S, 00, 25N, 50N, and 75N. They are grouped into Morning Sky (01, 03, 05, and 07, LMT), Daytime Sky (09, 11, 13, 15), and Evening Sky (17, 19, 21, 23). The Daytime Sky is mostly for planning sun-moon sights, but also useful in finding these bodies in a cloudy sky, without resorting to computations. Also, in some conditions, the moon and sky are almost the same color, even without clouds. A sample of the Evening Sky is shown below with a few color annotations added.

Here are the legends explaining the symbols. These are shown on alternating diagram pages.
The center of each diagram is overhead; the circumference is the horizon. The rings mark heights above the horizon of 30º and 60º. In the Northern Hemisphere, the north pole of the sky (NP) will be at a height equal to your Lat. The position of the moon is shown several times on each diagram, because it moves east relative to the stars at about 12º per day. Its position on a given date is marked by a circle around that date. The moon position is shown every 3 or 4 days, which we can use to estimate where it is on other days, including the 15th, the base date for the star data.

The arrows on the left-hand diagrams show how stars in that vicinity move during the 15 days after the 15th of the month, which can be projected back to show their positions at the first of the month. These can be used for estimating positions on dates other than the 15th, as discussed in the Notes on Star Motions at the end of this article.

When the sun (circle with dot) is showing, the sun is up, and it is daylight. The other bodies would not be visible except for the moon—and sometimes Venus, if it is far enough from the sun. In which case, we can figure from these diagrams exactly where it is located, and then look in the right direction, through the telescope of a pre-set sextant, and perhaps get a daytime Venus sight.

The green highlights mark the bright stars (visual magnitude-1). The column headed "S-4" is a relative photo-sensitive response indicating how bright they would appear in a photograph. This is not a useful parameter for us—even though we might, with effort, extract star color information from it; we recommend crossing it out, so it does not confuse anything. Orange highlights we added mark a couple bright mag-2 stars. Our textbook Celestial Navigation and The Star Finder Book each have extended discussions of star brightness and the complex visual magnitude scale.

As an aside, they label latitudes with the N in front, such as N25, meaning latitude 25º North. This is unfortunate, because in the marine world of celestial navigation we label latitudes with a following N or S and declinations with a preceding N or S, i.e., the star Arcturus has a declination of about N 19º, which means it circles the earth over latitude 19º N.

These diagrams are best used in print with an overlaid transparency sheet, as we will illustrate in a video later, but for now we can still outline here how they are work (which is actually quite well), and go on to compare this method with other methods.

In practice, when we need to predict the best bodies to shoot in a sight session, we are not likely to be at precisely Lat 0º, 25º or 50º (N or S), and indeed for evening sights, the right twilight time is not likely to be exactly 17, 19, 21, or 23 hr LMT.  Nevertheless, we will first pretend that is the case, to see how we match up with other methods, then we will choose some random set of circumstances such as sights at evening twilight on July 10 at 31N, 140W—an approximate point in time and space occupied by many sailors during any of several trans-pacific ocean races.

We look first at a DR Lat of exactly 25º N on July 15, 2019. In the first diagram above, we see the sun is still up at 17h LMT, so let's use 19h LMT as the test example, which must be fairly close to twilight. Here is that sky.

We added the color annotations. Green stars are the mag-1 stars; orange are at the bright end of the mag-2 stars. Jupiter and Mars are also available, as is the moon (empty blue circle) at about 15º above the SE horizon—an estimated position for July 15.

Now that we know what the sky looks like, we need to ask how do we select the best sights? Refer to our books cited above for the basis of these criteria:

Condition 1.  We want three bodies, as near as possible to 120º apart.
This is the primary criterion—there is no virtue in taking 4 stars, or even 10 stars. We want the three best, and then we want three or four sights of each one of them.

Condition 2. Bright stars should be favored.

Condition 3. If everything else is equal, the three should be as near the same height as possible.

Condition 4. Generally we want sights to be higher than about 10º and lower than about 75º.

Lower than 10º introduces refraction uncertainties; above 75º stresses the approximations we use to derive the lines of positions and sights higher than that are increasingly harder to take. Either one of these limits can be pushed some if a notably better 120º triad can be formed.

From a practical point, we can rule out the moon in this sky, because it is so low. Even if rather higher, it would not be a good choice, because it must be near a full moon, which is usually bright enough to distort the horizon below it (see our textbook mentioned above). We know it is near full, because it is rising just after sunset. Mars is also on the limit of too low. Thus, as a first guess, we are looking for the best triad of the green stars, or stars and Jupiter.

In practice we would look at this diagram as a printed page of the AA, then highlight the bright stars.  Then using a transparent sheet of some form, we draw on the transparency 3 intersecting bearing lines 120º apart. This we can do using any compass rose or universal plotting sheet. Then we rotate that with the centers aligned to find the bodies that are nearest this 120º. This is illustrated in the video. Here are a couple stills of the process.


Here we use a plastic lid from a nice QFC Chef's Salad as a good transparency sheet, overlaid on a Sky Diagrams page printed on letter size paper, the default page size in the PDF.  Such a transparent lid can also be used for depth sounding navigation, writing on it with a Vis-a-Vis marker, which dries but wipes clean with water. See this nav article that includes a section on line of soundings and also this video of the method by Starpath instructor Robert Reeder.

The Sky Diagrams are smaller than we would like, but still quite useable. I have to put it that way because the one paragraph Section 2212 of the  '58 and '77 Bowditch says the diagrams are of "limited value because of their small scale." We disagree. Below are blowups of work done on the printed sheet above. We rotate the lid to see which triads line up best with the green bearing lines drawn 120º apart.


To numerically compare best triads of sights, we need some way to weight the values of good separation (nearest 120º), good brightness, and heights. If we call these relative weights 70%, 20% and 10%, with limits of 10º to 75º and require stars brighter than 2.0, then this is the best triad [51, 33, and 32] by that standard—although it might not be the best in practice. It could be that one with just a slightly lower goodness factor would be preferred. We can get such a triad goodness factor from the StarPilot app's Find Best Sights function, which accounts for all these factors mathematically, looking at all possible triads that meet the user defined specs.

Computed values for these stars from the StarPilot output are:

Body                Mag   Hs             Zn      
51:ALTAIR       0.8   013°08.3'   086.2°  
33:SPICA         1.2   050°12.8'    206.3°
32:ALIOTH      1.8   054°18.4'   336.4°  

The challenge in this sky is there are no bright objects in the NW sky. We have 3 mag-2 stars to choose from here: #27 at 1.8, #32 at 1.8, and #34 at 1.9. These are a toss up in brightness (magnitudes are listed to the right side of the diagrams page), but #32 wins out slightly in the equal heights factor, although that is the weakest of the conditions. In practice these are equivalent stars for that direction in this sky. On deck we would take the one that looked brightest or appealed to us for some other reason.

Below is another contender where we favor brightness and give up a bit on the spacing factor.


Here we choose [26, 42, 53], all mag-1 stars. These bright stars would make an attractive set, even though they are not best possible spacing, and technically not the optimum triad. The computed sight data are:

Body                     Mag      Hs           Zn   
53:DENEB           1.2     016°02.5'   046.9°
42:ANTARES      1.2     031°16.0'   149.2°
26:REGULUS      1.2     026°35.9'   271.2°

Pub 249 Vol. 1

For comparison to the Sky Diagrams, a popular way to select the best triad of stars is Pub 249 Vol 1, a book issued every five years and good for eight. The latest is Epoch 2020. To use it we need a NA or AA to look up the GHA of Aries, then we subtract (or add in E Lon) our DR-Lon to get the LHA of Aries. For this type of star analysis we can simply assume our Lon is 0º, making the LHA = GHA and the LMT = UTC.

To match this exact Sky Diagram at LMT = 19h (recall we will do a random time and Lat below), we look up GHA Aries at UTC 19h on July 15 to get 218º 20.3'.  We can then go to the page in Pub 249 for Lat = 25 N, and down to the LHA Aries we found.


The conventions with this pub are the bright stars are in CAPS and the three best are marked with a diamond, namely [40, 42, 26] which have brightness 2.1. 1.0, 1.4). I added the red annotations. The Pub 249 height limits on best sight choices are stricter than we might guess, being about 13º to 60º, which must be related to aircraft sextant sights from higher altitudes. A marine sextant sight at 75º is no more difficult nor uncertain than one at 60º. Also Pub 249 has more weight on sights of roughly equal height, which must be for the same reasons.

Here is the triad Pub 249 Vol. 1 proposes as we would discern it in a Sky Diagram (green circles).


I think this is not one we would have chosen from the many we can find with the Sky Diagrams. Pub 249 is a fast, convenient solution, but it does not always choose the optimum triad, and it can never find one that includes planets. I think we have to conclude that the Sky Diagrams are better than Pub 249 Vol. 1 for sight selection, provided you invest in a good Chef's Salad lid or some equivalent.

2102-D Star Finder

Another popular way to predict best triads is the 2102-D Star Finder. This plastic device from the 1920s is still for sale, now as a commercial product, although in the 30s and 40s it was an official Navy Hydrographic Office Issue, H.O. 2102-D. We are a strong supporter of this device and indeed have a book on its use.


The device with its various templates for different latitudes is essentially a hand-held planetarium. You can see when and where bodies rise and set, find the best sights at twilight, or simply go on deck and take sights of 3 bodies in the right relative directions and not even worry who they are. With just a few minutes work you can with this device identify the stars you sighted. The separation of about 120º is found on deck by facing one chosen star, and then take a hard look over each shoulder.

As with Pub 249 Vol. 1, we need an AA or NA to look up LHA Aries (218º in this example) and then, with the 25ºN blue template in place on the white star base plate, we rotate the template to align it with that LHA Aries value as shown below.


The color annotations we added show how to read heights (Hc) and bearings (Zn). The ones shown are for the [51, 32, 33] triad shown above.

In general the way we do best sights selection with this device is to set it up with the right Lat (choice of blue template) and LHA (rotate template on white base plate), and then read off the Hc and Zn of the bright stars, which we then plot on a universal plotting sheet. A sample from The Star Finder Book is shown below for a different sky.
In short, optimum star prediction with the Star Finder is just using it to make a big Sky Diagram!  We could also annotate such a plot with star heights, but in this case we only plotted bodies with usable heights. To include the planets or moon, use the Star Finder's red template and other NA or AA data to plot them on the white base plate, then we can include them. But that is extra work that is all done for us with the Sky Diagrams.

The one advantage of the Star Finder solution is we are using exact times for the LHA setting, with latitude templates every 10º rather than 25 in the Sky Diagrams, so we end up with fairly accurate values of the Hc and Zn, which are valuable for setting up the sextant to take the sights. Using Sky Diagrams the Hc and Zn we get are more approximate. On the other hand, once we have determined the best triad from the Sky Diagrams, we can compute accurate values of Hc and Zn for the actual sight taking using sight reduction tables.

Sky Diagrams at random sight times and latitudes...

A LONG ANALYSIS WITH A SIMPLE CONCLUSION

We have seen that in an idealized example, meaning a case that matches exactly the date, time, and Lat of one of the diagrams, the Sky Diagrams are an excellent, if not superior, way to manually find the best triad of sights. Now we need to see how much harder it is for realistic sight times that do not match one of the diagrams. To do this, we choose a random but realistic evening twilight on July 10 at 31N, 140W. This involves, on some level, a triple interpolation: Lat, LMT, and Date.

First we gather the real data, which we can get from NA or AA. Evening sights are taken between civil twilight and nautical twilight, which at 31N on July 10 (see our text on this determination) are 1934 and 2007 LMT. We might then plan our sights for the midpoint of this 33-minute sight session, namely 1950 LMT on July 10 at 31N.

We have stock diagrams at 25N and 50N, so at 31N we are looking at a sky that is roughly halfway between these two. Our target time of 1950 is about 20h, which is halfway between the 19h and 21h given. Also we are looking at July 10, which is 5 days earlier than the stock diagrams, which are all valid on the 15th of each month. To do this numerically seems daunting; the right sky is roughly the average of four of the stock diagrams.

But do we really need to do that? After all, I know from direct experience that we can sail across the Pacific (WA to HI) and pretty much use the same three stars for most of the voyage, maybe shifting choices once, only toward the end. This is a latitude change 27º (48 to 21), spanning 3 time zone descriptions (+7 to +10). So chances are the top choice triads are not going to change much for rather large changes in latitude and date. (In one sense, discussed in the star motion notes below, we carry our triads with us as we sail west.)

So let's start by just rounding everything to the nearest diagram, which the Sky Diagram's explanation section hints is doable, referring to interpolation as "... such refinements are not usually necessary." But they are in airplanes and we are in boats, so we have to test this.

A sight session spanning times of 1934 to 2007 can be rounded to the 19h, and Lat 31N we round to 25N, and July 10 we round to July 15, then we are back (coincidentally) to the example done above (July 15, 19h, 25N), whose technically best triad was [51, 33, 32]. We can now use StarPilot to see if this is the right answer for 1950, July 10, at 31 N, which we compute specifically for those values, shown below.


And yes, that is the best triad. Not only does this rounding method work, in this case this triad at a special time and Lat is even better than the base diagram, as shown in this StarPilot output.

Without going into details of the solution, we can see that even though the Hc and Zn of the stars are somewhat different in these two skies, this is not just the same triad, it is numerically superior at the special time with a goodness weight of 2.2 compared to 1.8.

In short, we have an easy way to test whether or not rounding everything to find the right Sky Diagram to use will be dependable: we just do that in multiple cases, and then compare the answers with the numerical solutions from StarPilot. The question is, how do we choose the random sight times to test? One way is we look at the vessel positions from any documented ocean crossing and choose a few positions from that. We just happen to have a perfect candidate: our published training exercise (Hawaii by Sextant) based on a July, 1982 voyage from Cape Flattery, WA to Maui, HI, carried out purely by cel nav. We will just assume this took place in July, 2019 and select several sight times and locations along that hypothetical voyage.

Here is the route and the points we choose to test.


First the easy part, we just look at what triads the StarPilot found at evening and morning twilight at these positions and dates.

The above optimum triad solutions are computed using the exact twilight times and latitudes of these hypothetical sight sessions, both for morning and evening sights. The Lat, Lon values shown are in the StarPilot's shorthand format, designed for quick input: 34.567 means 34º 56.7', etc.  Here are now the rounded values that we use for the Sky Diagrams.


Now we look at the Sky Diagrams for each of these rounded sights to see what we get from them compared to what we know are the optimum triads.


These are the morning sights. The blue and orange triads are the the ones we know from the exact data are the technically optimum choices. The red triads are the ones we would have selected from these stock diagrams using the same quality criteria. We get the right choices, even in this dramatic rounding of all values, in all cases but #6 and this one is very close.


These are the evening sights, with the same conventions: blue, green, purple, and orange are the known optimum triads for the precise conditions, and red is what we would have chosen from these stock diagrams without knowing anything more. In all cases but evening sights #3, we get the right choice by total rounding to the charts available.

However, we need to look closer to see if #3 is really wrong. A real navigator would not choose the moon in the #3 evening sights. StarPilot chose it because it generated the best triad quality score, but we know not to choose a moon at ~30º high, so we would have chosen the StarPilot No.2 triad, which is star 37 for that sight. The triad goodness factor was almost the same.

Second, the real Lat for this session was 37.44, which is just barely leaning to 50N over 25N. In fact, we have several arguments here to override the strict Lat rounding, and instead go to 25N. At 50N the sun is still up, and by the time it sets, the chosen #12 (bright Capella) would not be an option. So it would not take much reasoning to use 25N and in that case all matches up.

I think that is all the testing we need to do! Recall, too, that these are analyses and decisions we make for the first sight session in a cel nav voyage. If we choose something wrong the first night, we then know it, and how to correct it. Then we are right the rest of the voyage until this quick look at the Sky Diagrams changes our mind.

Also I should point out that all of this best bodies planning can be done before you leave the dock! We see that there is broad leeway in times and latitudes that still come to the right choices, so you can DR your crossing and make a table of best bodies for each region of the route. Chances are you will have the right choices in hand as you cross without further work. It is an excellent exercise that gets you thinking about the sky before you get there, which is just one more step along the path of good seamanship, which is preparation.

A bonus of these diagrams is once we find our target triad, we can also draw in our heading line, as shown below, and this way quickly picture where the stars are located relative to the bow.


Here we have bright ones on the port bow and quarter, and the fainter one roughly on the starboard beam. With such a layout you can anticipate if it will be needed to change headings, if possible, during a sight session, or maybe set sails will prevent this triad, so look for another.

Star Brightness and Sun-Moon Daytime Fix

There are two tables in The Star Finder Book that help with choosing best sights. Table 3-3 tells what days and times of month we can get a good sun-moon fix during the day, along with other special uses of the moon, and Table 3-1 tells how perceived brightness differences can be determined from magnitude differences. A mag 1.7 star, for example, is about 40% brighter than a mag 2.1 star. Pub 249 Vol. 1 with its height limit of 60º often has to dip into the mag-2 stars, which sometimes limits its ability to find the best triad.

In Table 3-3 we learn that one chance for a good sun-moon fix is moon age days 6 to 8, a waxing half moon near the meridian at sunset, with best sight time in the mid afternoon. In principle we can also get such information from the Daytime skies of the Sky Diagrams. We want the sun and moon about 90º apart, which means half moon. The days of the half moons can be found from the NA, which lists moon age on the daily pages (6 to 8 or 21 to 23), or from the AA, which lists illumination on the daily pages (~50%). In the latter we can also find these dates at a glance from the Semiduration of Moonlight Table, intended for some purpose in Polar Navigation.

From the Semiduration table In July, 2019 (page A155) we have a waxing half moon on day 9, and a waning one on day 25, which can be confirmed with their illumination data. Now we can note these positions on the daytime sky diagrams to mark when we should look out for good sun-moon fixes.


The days of waxing and waning half moons are plotted, along with the Celtic Goddess Symbol, a reminder about waxing and waning. We immediately see several important things. First, the exact days of half moon are not the optimum sight days, which we find from the Sky Diagrams by making their relative bearings near 90º. We also learn here at home what many celestial navigators once learned underway. Namely, sailing into the tropics in late June or early July leads to difficult sun only navigation. As we sail under the sun, those relying on noon sights alone are stuck for some days without sights. The sun is just too high at midday. Thus, we recommend learning all cel nav, not just sun sights.

Here we see that at latitudes anywhere near the sun's declination, sun-moon sights will be very difficult. One of them will be near overhead. These sights are difficult because the crucial technique of rocking the sextant is difficult, because we do not know which way to look when we rock. Our textbook discusses ways around this.

On the other hand, at higher or lower latitudes we can spot the best times and days do to the sights with the Sky Diagrams. In this application, we are using the plotted moon positions to tell us the date, and then we assume that the sun's position on that date at that time will be about where it is on the 15th.  Below we test a few of these conclusions with the StarPilot. Namely, we take the proposed  time and date based on the exact time of half moon, and then we shift the date to improve the sights based on Sky Diagrams, then plot out this proposed sky with StarPilot.


All show good 90º intersections. In practice we have a 2 or 3 day window on these sights for usable fixes, but this way we can spot the best time. Indeed, with a highlight marker for sun and moon we do not even need to look into half moon times. We can go direct to the diagrams and look for 90º opportunities. Likewise for sun-Venus sights. The Sky Diagrams do a fine job on these daylight sights.

Grand Summary

My conclusion is that a printed copy of the Air Almanac's annual Sky Diagrams and a transparent plastic container lid is the easiest and fastest way to manually choose the optimum triad of celestial bodies for a sextant sight session. Several colors of highlight markers helps. The diagrams are 76 pages of a free PDF copy of the Air Almanac, published annually. We recommend they be considered part of the celestial navigator's standard toolkit.

I had to specify "manual" solution in that conclusion, because if we slip into the world of electronics, we get other solutions, notably the StarPilot, which offers state of the art sight planning. That process is discussed in the StarPilot User's Guides, and related videos. Its quick and easy interface was key to the detailed analysis carried out above.

The attraction of the manual solution is that those studying cel nav, if not to pass a USCG exam, are generally doing it to be a back up to electronics failures on an ocean passage. In that event, we go back to old-school cel nav, watches, books, and plotting sheets. What we are adding here is the suggestion that a print out of the few pages of the Sky Diagrams that cover the month of your voyage would be a good addition to your preparation of for an all-manual solution, not to mention that the full (free) PDF of the Air Almanac is a back up to your other almanac data.

Let me conclude with reference to a related discussion "Why study cel nav in the age of GPS?"

For those working through our ocean navigation exercise in Hawaii by Sextant, we added a set of the July 1982 Sky diagrams to the support page for that book: starpath.com/HBS


Notes on Star Motions in the Sky Diagrams 

TOTALLY OPTIONAL, NOT NEEDED

I hope it is clear from the above notes that we do not need to know more about these diagrams to efficiently use them to find the best triads to start with in any sextant sight session. But there are ways to fine tune the interpolations based on known star motions and how they appear in these diagrams.

Star locations within each diagram are affected by two major astronomical motions. First, the earth circles the sun once a year (360º in 365 days), which is about 1º per day. This means that at the same time on consecutive evenings, the stars will be about 1º farther to the west than they were the previous evening at that time. This is indeed how the summer sky evolves into the winter sky—how the first sighting of Sirius before sunrise told ancient Egyptians the Nile was about to flood.

This orbital star motion is indicated by short arrows on the left-hand diagrams of each page (1h, 9h, 17h). A sample is shown below that we have annotated in red.


Each diagram is valid for the 15th of the month. These arrows represent how far, and in what direction, a star in that vicinity will move during the 15 days following the 15th of the month, and from this we can project back to show where it would have been 15 days prior to the 15th, as shown above.  This motion is what we use to estimate star positions for dates other than the 15th. This is a date or orbital correction.

The red rings about the pole that we added are fairly good star tracks on this diagram at high latitudes, but these paths are squashed into ellipses at lower latitudes.

The second motion we need to account for is a time-of-day or rotation correction to account for the rotation of the earth about its axis on any given day. This causes the stars to move 360º in 24 hr or 15º per hour, which is the difference between, say, the 17h diagram and the 19h diagram. We can see that in the diagrams themselves.


To illustrate this daily motion, we show here the 21h diagram overlaid with the 17h and 19h locations of stars #53 and #46. At 15º per hour, in two hours they move about 30º.

Despite the complexity of depicting a dome of stars as a flat sky diagram, these two motions lead to what many navigators are well aware of. Namely, the sky we see above us now will be exactly what a navigator located 15º of Lon west of us will see see one hour later. The dome of fixed star positions rotates about the pole, 15º each hour.  This does not apply to moon or planet positions that are notably moving relative to the stars.

Perhaps less often thought of, the sky a navigator sees on the 15th of the month at a specific time is the same that was seen an hour later from the same place on the first of the month. To see how this works, rotate the sky backwards by 1º per day for 15 days, and then advance the time we look at it by 1 hr. The 1-hr forward in daily rotation of 15º clockwise just cancels out the 15 days of of backward orbital correction of 1º per day counterclockwise. Likewise, the sky we see on the 15th of the month is the same as will be seen on the 30th of the month, one hour earlier.

In other words, the 19h diagram that is valid on the 15th of the month is also valid on the 1st of the month at 20h, and on the 30th of the month at 18h.  Here are a couple screen caps from the StarPilot app to illustrate this behavior  at 25º N.


On the 15th at 19h, we see the stars with an optimum triad marked, plus the moon, Jupiter, and Mars. The moon was not visible in the other skies, and we see Mars notably move relative to the stars in these views. The star motion rules we are discussing apply only to the stars. In this case, Jupiter must be so far away from the sun that it effectively behaves like a star. This is common for Jupiter and Saturn, but Mars and Venus will usually move notably from day to day.

The summary of this is: Back 15 days and forward 1 hr gets to the same sky; Forward 15 days and back 1 hr gets to the same sky of stars—moon and planets not counted. Put another way, we can round the actual sight date not just to the 15th, but we can use the 1st or 30th, whichever is closer. If the 1st is closer than the 15th, then use the diagram that is 1 hr later than your sight time, and if the 30th is the closest, use the diagram that is 1 hr earlier.

So with that background, we see that we could fine tune the choice of diagrams depending on the date relative to the 15th—but we have also seen that this is not necessary!

I include this discussion of star motion because it is mentioned in the official explanation to the diagrams, but without details. To that I must add that I have in fact looked for cases where we could take advantage of this date correction for better choices, and I could not find any. In about half the cases, the date-corrected time will be an even hour, for which there is no diagram, so we are left interpolating again. The earlier conclusion stands; there is no need for further interpolation. Round everything and choose your stars. If near halfway between any two standard latitudes (0, 25, 50, 75) then consider other factors that might cause you to lean one way or the other.